Showing posts with label Cooking Tips. Show all posts

Ohm Rice

I wanted something simple and different to do with ground Axis and rice tonight. I was Googling for ground beef and rice recipes when I found Ohm Rice at Recipezaar.com. I changed it up to suit our love for peppers and spices! The recipe in the link is a bit bland as is, but I gave it a five star rating. It's just so good and so simple. And easily changed to suit your own tastes. I now have this wonderfully simple Korean recipe to add to my repertoire. I'll be cooking this a lot--especially for guests as it's so inexpensive and different! The leftovers are obviously going to heat up extremely well, I can't wait to heat some up in the morning and fry an egg to put on it. Mmmm.

This recipe is so cheap, fast, and tasty I can't even begin to express my complete joy in finding it! In fact, I'm so eager to blog it that my freshly prepared bowl of Ohm Rice is sitting on the counter with only three bites eaten out of it. Hubby ate one of those bites and gave it two thumbs up before he dashed off to the studio. Although he had several bites before the egg was added--he was helping me season it. By the way, Ohm Rice does not taste like your average ground beef recipe! It's so good you'd think it couldn't possibly have something so mundane as ground meat in it. I actually detest cooked carrots but don't even notice them in this dish.

It's a good dish for chopsticks, which is how we eat all our Asian dishes. The fork you see in the images way below was used only for taste testing and to cut the egg open for the camera--fat lot of good it did me visually. The ingredients seem (mostly) so American that I nearly forgot it was an Asian dish and grabbed the chopsticks only at the very end.

No, runny egg yolk is not gross. It's bursting with delicious texture, and flavor and enhances a dish like this amazingly well. Think of thick, yellow, warm egg yolk as a rich and exotic sauce.

I do wish I'd had green onions instead of plain onions for this dish, I think it would have been tasty and more attractive. I'd have kept the chopped green tops separate and added them toward the end so they would have retained their color and crunch. Heck, even just having a few chopped green onion tops to add at the end of this exact recipe would have been fine.

Ingredients:


1 lb ground beef, pork, turkey, or venison. I used ground Axis
1 large potato, grated
2 large carrots, grated
1/2 a large onion, chopped
3 Kung Pao peppers, chopped (if available) -- if not, substitute 1 tsp. crushed red pepper or more to taste
1 tsp. honey
2 minced garlic cloves or 1/2 tsp. garlic powder
Instead of the above two ingredients, I used about 1/4 tsp. of My Beloved Garlic Honey and minced one of the Garlic Honey Pickles in addition to a few unmeasured dashes of garlic powder. The recipe really did need just a touch of sweetness and a little garlic!
4 TBS soy sauce (more if needed for taste and for liquid)
2 TBS Olive oil or fire oil because it will be threatening to stick to your pan if you don't add oil.
salt
1 cup uncooked Jasmine rice if you have it, if not, just use your favorite rice.
1 egg per serving

Directions:
Cook rice according to package directions or in your rice cooker--when done set aside until ready to use.

Cook ground meat until just over halfway done, drain off excess fat and liquid, then add grated vegetables, garlic, honey, peppers, soy sauce, the oil, and 1/2 tsp. salt. Cook this mixture until onions are soft and potatoes seem done. The vegetables should not be mush. Please don't overcook!

Mix rice in to dish and stir well. Taste and see if you need a bit more salt and/or soy sauce.

Put mixture into as many bowls or onto as many plates as people you will be serving and fry eggs in butter for each individual serving, putting a fried egg on top of each serving. I prefer mine rather runny but others may not. Another option is to make individual, one-egg omelets for each serving. The omelets should be flat, open, and unstuffed with anything. Garnishing with a bit of chopped green onion would be very attractive. Once served, the eater would chop their egg up a bit and stir it into the dish to eat. I've also seen this dish (online) served wrapped inside an omelet and covered in ketchup. All I can say about that is, ew! But to each her own, yo.

This dish reminds me a lot of really good fried rice, although the potato adds a new and filling dimension!

Below is the photo journal of this dish. I was too hungry to cook another egg and try to make it prettier for the photos. It was plenty tasty all the same! And this isn't the pretties dish anyway, but it's definitely homecooking, Korean style. At the very bottom is a little tutorial on how to chop an onion for those of you who don't watch the Food Network.


Images will enlarge when clicked.


How To Chop An Onion:


The trick to chopping an onion is to cut it in half lengthwise and leave the big, gnarly end intact on each half, cutting off the smoother ends only if needed and peeling the onion. Long slices aimed more or less towards the core of the onion, going from tip to tip of your onion half (without cutting into the gnarly end), are the next step. Then slice across your longitudinal cuts, thinner for more finely chopped onions and wider for more coarsely chopped. This is as simple and fast as it gets without a fancy onion chopper. Leaving the big, ugly end in place holds everything together while you chop and allows you to waste none of your onion. By the way, I chop, slice, and dice as much as possible on heavy-duty paper plates. It's probably not very "green" but I don't have the energy for endlessly washing cutting boards. I also don't have enough cutting boards! I figure I am saving water by using paper plates so maybe it all works out in the end.

If it matters, we very rarely eat on paper plates. I like a real plate when I chow down!

Click here for the slightly easier to print version of Ohm Rice.

Windshield Chicken

Solar Cookers in Rwanda--saving and changing lives in ways you'd never imagine.


I apologize for the following crap photos. I taped my camera together long enough to shoot this, but it fought me all day so I was trying to just shoot as fast as I could in between total breakdowns and freezes. Soon my little digital will be off to the repair shop. Please wish it a good journey!

Using the Windshield Solar Cooker, I have made Chilaquiles. Yes, I know, I already blogged Bryzanne's Chilaquiles. And if you want to know more about them, just click that link. This entry isn't really about the recipe as much as it's about a remarkable and super-green method of cooking.

Solar cookers are Changing Lives all over the world. In a Refugee Camp in Chad, families often have to sell as much as half their allotted food in order to buy enough firewood to cook the rest of their food. How crazy is that? Firewood and other fuel sources are not readily available in many parts of the world, including Chad. And the danger of fire and/or smoke inhalation is great when all your cooking is done over flame.

Cooking over a fire is fun for a lot of us, but we aren't grilling our steaks in our living rooms and having to breathe in the fumes and smoke. Most of us aren't going hungry because we can't find wood, dried weeds, or dried dung to cook with. With the solar cooker, there is no need for any fuel but the sun. Water can be pasteurized in 30 minutes--this alone makes solar cookers a miracle in some areas. There is no risk of fire with a solar cooker. Solar cookers are even Providing Jobs for people. In Ethiopia "Sun Ovens" are being assembled by Ethiopian staff and in many areas, people (women, especially) have discovered that having enough solar cookers allows them to open small kitchens where people can come purchase food. You can bake in these suckers! Cakes, breads, muffins, puddings, casseroles..... AWESOME!

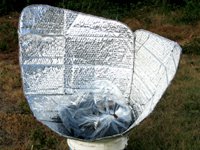
I made my solar cooker from scratch, I'd have preferred to buy one since Purchasing Them Online raises money to help place solar cookers where they are needed most. But, alas, I'm a bit broke. I spent a total of $7.68 plus 8.25% sales tax for this solar cooker. I already had the roasting bags, the cake rack (which is too small, I need a slightly larger one), the bucket, and the windshield shade. My very small investment was for the pot. Newer solar cookers don't require the roasting bag, but I couldn't find the glass bowl I needed to make myself the new "Hot Pot" solar cooker shown in the "Purchasing Them Online" link.

If you know nothing about solar cooking, then you might think of them as a cordless slow cooker. They can reach up to 350 degrees if they're designed well and if the sun is cooperating. Most of them cook ar0und 250, mas o menos. It just depends on your location, the amount of sun you are getting, and the style of solar cooker you have.

When I bought groceries Thursday night I didn't intend to cook the Chilaquiles in the solar cooker. If I had, I'd have bought some boneless, skinless chicken breasts. Instead, I had only whole chickens to deal with. I decided I'd skin and split one for the Chilaquiles. My attempts at splitting chickens are usually rather messy and frustrating. But this one split PERFECTLY. Turns out a partially frozen chicken is really easy to split! I know it's easier to slice raw beef and cut other meats when they are partially frozen, but I didn't think it would make a chicken easier to split. Oh, my, it was easy as pie (or nearly so). Woot! Learned a new trick! Skinning a partially frozen chicken, however, is a pain in the arse and I wish I'd waited for it to defrost just a bit for that. To split this partially frozen chicken, I stabbed the knife straight in and worked my way through it, using the frozen meat itself as leverage to make my cut as I went along. I've never split a chicken so quickly. The bone and cartilage sliced as easy as the meat.

I didn't follow my usual Chilaquiles recipe for today's Windshield Chicken. I wung it. Is that a word? Prolly not. Anywhoo, you don't really use much liquid when you cook in a solar cooker. Not unless you absolutely have to such as when you are cooking rice or beans. In a solar cooker, your food is cooking in it's own juices for hours. Meat and veggies don't tend to need much more liquid, if any, than what they already contain.

First Ingredients for Windshield Chicken:

2 lbs. chopped tomatoes
1 medium chopped onion
Cilantro until it makes you happy
1 TBS sea salt
1 TBS cumin powder
1/4 tsp. chili powder
2 tsp. oregano
Juice from one lime
1 heaping tsp. garlic powder (I was too lazy to mince some garlic cloves today)
1 split and skinned chicken (or an equivalent amount of boneless, skinless chicken breast and or thighs--really, the split chicken was a pain to work with, don't do it)
Normally I'd also add an 8 oz. can of tomato sauce but I wanted to see how much liquid the chicken and veggies would create without it and so I added the tomato sauce at the end instead.

I placed the chicken on top of the rest of the ingredients and mashed it down so the lid would fit well. At about 8 a.m. I had the whole thing set up out in the front yard to catch the first morning sun but there were clouds this morning! Clouds? It's been high and dry here for weeks. I loved the cool morning but the one morning I decide I want to cook with the sun and there's clouds? They persisted for a few hours and I had to bring the dish back in while I waited for the sun to come out enough to heat up the oven. Full sun isn't absolutely necessary, but it can't be so cloudy that it blocks the light.

With the sun properly out by 11:00 a.m., the inside of the roasting bag got up to 200 degrees inside of 30 minutes. FABULOUS! What a difference a cloud makes. My solar cooker has a gap in it that allows air in, I didn't have enough velcro tabs to make it all stick together the way it needed to and it really slowed down cooking time. Which is fine with me. I wasn't in any hurry with this experiment today. And even with the gap, it got plenty hot enough to cook a whole chicken!

The Windshield Chicken cooked at 200 degrees for most of the day, but after about five hours hubby and I made a few adjustments that brought the heat almost immediately up to 250. At 6:30 the chicken was done enough for the meat to pull easily away from the bone. I deboned it, shredded the meat, and put it back into the cooker, adding the can of tomato sauce and another 1/2 tsp. of chili powder. It didn't need to cook anymore, per se, I just wanted it to simmer a bit and get happy. I look forward to cooking solar a lot more, we'll get better and better with it and cooking times will decrease.

The second set of ingredients needed for Chilaquiles are fried corn tortilla chips, panela cheese, and Mexican cream a.k.a. crema fresca.

The chilaquiles, with the chicken deboned and shredded and mixed well with the rest of the dish, are served over the fried chips, sprinkled with panela cheese, and crema fresca is drizzled on top. It's delush! Here's my regular recipe for Bryzanne's Chilaquiles, which includes substitutions for crema fresca and panela cheese.

And for no particular reason at all, here are the Scotch Bonnets I bought at the store last night. They've been deseeded and are drying in my dehydrator. Hubby hasn't had time for His Effing Garden this year and so I don't have any home grown, super hot peppers for my pinto beans this summer. I simply must have them. And dried peppers work fabulous in homemade pinto beans. These peppers, once they are dried, will season about ten pots of beans. I should have bought more peppers.

PhotobucketPhotobucketPhotobucketPhotobucketPhotobucketPhotobucketPhotobucketPhotobucket

Pico de Gallo

Pico de Gallo
Fresh, cool, delicious.

Anasazi Beans

Anasazi Beans
Dang, that's a pretty bean.

Mom's Beef Enchiladas

Mom's Beef Enchiladas
Except we used ground Axis.

My Solar Cooker

My Solar Cooker
Needs some refinements but it works!